Curses on the Cotter Pin
A curse, a curse, a curse on the cotter pin. Curse. A curse. Curse on the cotter pin. Cotter pin. A curse on those who invented you. A curse on those who made you. Most of all a curse on those who use you, who use, yes, you who install. You. May they all find their own special place in hell while their bodies decay in an early grave.
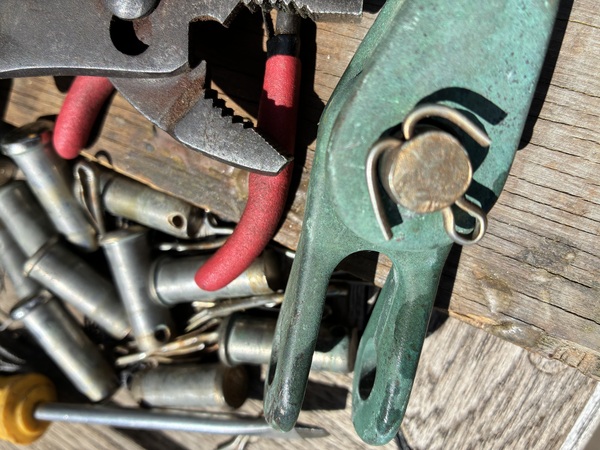
Oh, cotter pin sometimes you break and you break and you are left in the hole. Then we have to file you out. Other times you just twist and turn away as we try to bend you. You do not yield. There is no tool, no tool, no tool made to remove the cotter pin.
We just slip them in. Then, all that is meant to do is to spread them apart, their little legs spread apart just enough. Spread their little legs, just like we make love to them. But no, no, they have pointed little ends. Pointy ends that snag sails and skin and rip. Not. Not satisfied with spreading them apart. We have to bend them back. You have to bend back the legs, wrap them around, so that they are impossible, impossible to remove. Yes. Curses on those who’ve bent back the legs of the cotter pin. Their designers did not want their legs bent back. Their designers who put the pointy ends on them. Their designers didn’t want their legs bended back. They shouldn’t have put pointy ends on them. Oh, pointy ends, yes sir. Pointy ends on the cotter pin.
Cotter pin, I will have you. I will have you yet, cotter pin. There is no tool made, no tool invented for removing the cotter pin. There are only pliers and needle nose pliers or blunt nose pliers or screw drivers– all general purpose tools. Nothing. Nothing special purpose made to just take cotter pins out. You have to make do. Bend them. Bend them to your will as you bend the cotter pin to your will.
Die cotter pin, die. Die in the depths of the ocean. May the cotter pin decay in the depths of the sea. May it rust ‘til it is no more than dust. Cotter pin, curse you. How does Poseidon feel about decaying the cotter pin? Eating the cotter pin. Aye, Poseidon does not want your cotter pin. Who would have the temerity to send cotter pins for Poseidon to destroy them? He does not want anything to do with destroying our cotter pins. Keep cotter pins to yourself, he’ll say. I don’t want your cotter pins. In torrents of wind to blow you off course. In great waves to overturn you. There will be my punishment for giving me your cotter pins. No. Do not send your cotter pins to Poseidon. They deserve, of course, to rust quietly lying on the sea bed, turning to dust. But no. That takes too long. That is much too slow an end for a cotter pin. Not to mention Poseidon doesn’t like it. We don’t want to make Poseidon angry with us, do we now? Oh no, oh no. Only blessings on Poseidon. Offerings of sweet things to Poseidon, things that Poseidon enjoys. Like little maidens, little mermaid maidens. Not cotter pins. They are double legs and lacking arms they are.
You’ve to send your cotter pins to Thor, to melt in his furnaces. To burn. To burn to nothing but coal dust. To burn to carbon fuel for the fires of the forges of Thor. There. There is an end for a cotter pin.
What of the people who use them, hmmm? What do we do with the people who use cotter pins? Who bend their little legs all back around the clevis pin circle. It takes them but a minute to do it and it takes me half an hour to remove it using this general purpose tool, these pliers. Trying to get a grip. Trying to get a hold. Trying to find leverage. Cry death. Death to the cotter pin. Death to the cotter pin and curses on those who use the cotter pin.
Oh, yes. Those who use the cotter pins. To be damned to eternity removing them. That’s their punishment: Down to eternity removing one cotter pin after another in endless, endless toil.
Ah yes. Yes! Cotter pin. I vanquished you. You are one more dead cotter pin. Gone, cotter pin. Rot then. How many more? One more! One more, at least. At minimum. Do I know how to do this yet? Did I, have I learned? Have I developed a technique? Have I become semi expert at the removal of cotter pins? Have I become a cotter pin destroyer? Have I become a cotter pin expert? Aficionado? Devotee? I will go home to my pretty wife and tell her, oh pretty wife. I have become expert at removing cotter pins. I know how to do it, now. I can get a cotter pin out in a jiffy. I can get a cotter pin out. In only moments, easy as pickings I can, as making a pie. Oh, yes. I have techniques. I have strategies. I am a man who can remove part cotter pins without any trouble at all! No troubles all! You just have to know how to do it, and then it’s easy. It’s just your lack of knowledge is the only problem. If you knew what you were doing, you wouldn’t mind the cotter pin so much.
Oh, is that so, is it? Well. I do mind the cotter pin. I don’t care if I can remove a cotter pin by looking at it. I still would curse it. It is still a curse, a cotter pin. Think about it. It’s made not to come out. That’s the whole point. Mmmm, that’s funny. It’s effective because it’s secure. It’s secure. It won’t come out. It is safe. Aye, but I’ve seen cotter pins corrode. I’ve seen them corrode all right. I’ve seen them become brittle and break out. That’s why you don’t reuse them. Oh, yes, don’t reuse a cotter pin. Always throw them away.
Yes, throw them all away. Every one of them. Make no more of them. Curses on the cotter pin. Ah, that one came more easily. You see? All it requires is expertise!
Expertise be damned. Curses on the cotter pin.