PiCam
I made a camera for the back of my boat. It’s a Raspberry Pi with a pair of cameras attached. This enables me to program video capture of a passage.

Make a bootable SD card for the Pi
The Raspberry Pi Imager put an OS image on a micro-SD card that
fits in the Pi. The Pi boots from this. I call it the “bootfs”.
“bootfs” refers to the SD-card file volume that appears on my Mac at
/Volumes/bootfs when it is mounted on the Mac.
The imager will write a public key for SSH access to the bootfs. It optionally configures remote access using Raspberry Pi Connect. I did both.
For the WiFi connection, I provided credentials to the WiFi onboard that connects to the internet, “Chancho”. More on this below.
Save a copy of the bootfs files, network-config and config.txt. Replace
config.txt as described to configure the cameras.
It doesn’t hurt after making the initial boot image to open an SSH session
while attached to Chancho and upgrade the software by typing sudo apt
upgrade. It takes a few minutes.
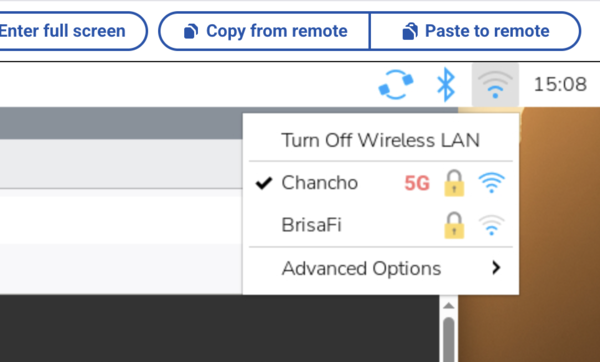
WiFi networks
The Pi connects to the Starlink “Chancho” network preferably. When that network is not available it connects to the onboard WiFi “BrisaFi”. BrisaFi does not have an internet connection; however, it allows connection to the Pi from the Mac when the Starlink is off. The Starlink, Chancho, only comes on when I turn it on to access the global internet, especially to get weather. It is much to power hungry to be running all of the time.
After booting the Pi to the Chancho network the first time, add the connection to BrisaFi. The BrisaFi network should be available.
Connect to screen sharing using Pi Connect. Use the wifi symbol in the upper-left corner. The WiFi configuration instructions have some details.
Under “Advanced Options” select “Edit Connections”. Use the plus sign to add BrisaFi. It has WEP2 security with a password.
Edit the Chancho connection. On the General tab, up the priority to one.
It is possible to do this with the command line, using nmcli. I wasn’t
able to pull that off. It would disconnect me when creating the BrisaFi
connection.

Configure the cameras
The cameras I have are not the models from the Pi organization. They are
supported with a modification to the config.txt file on bootfs.
~$ diff /Volumes/bootfs/config.txt ~/Desktop/config.txt
17c17
< camera_auto_detect=1
---
> camera_auto_detect=0
51a52,53
> dtoverlay=imx708,cam1
> dtoverlay=imx415,cam0
You can also edit the file, /boot/firmware/config.txt later, in a shell
session. The dtoverlay lines go under [all] at the end of the file.
The commands for the camera are according to the rpicam-apps instructions.
Documentation for the camera hardware and configuration are according to the arducam instructions.
The cameras I am using are the IMX708 and IMX415.
- The IMX708 is the flatter camera cabled to Cam1 connector. It has 2304x1296 @ 30fps (12MP) resolution.
- The IMX415 is the deeper camera cabled to Cam0 connector. It is an ultra low light camera with 3840 × 2160 (8.3MP) resolution.
Test the cameras by opening a remote desktop on Pi Connect (Chancho network), opening a terminal and trying:
- Bottom, low light:
rpicam-hello --camera 0 - Top, high resolution:
rpicam-hello --camera 1
The scripts
Most of the following can be accomplished without an internet connection, connected with BrisaFi, the on-board local network. Exceptions are noted.
The idea is to capture fifteen seconds of video every hour. The Pi is not wired to power. It runs from a battery that needs periodic replacement and recharging. So, secondarily the idea is to have the Pi sleep on low power consumption when it is not actively making video.
Video capture
To begin with, we have a script that makes the video grabs. The essential line in these is that which records video:
rpicam-vid --camera 0 -t 15s --config grabConfig.txt -o "${DEST}" >"${LOG}" 2>&1
The output DEST goes to a designated directory. The file name is a TIMESTAMP with the camera number appended. Thus files will sort in order of time, with the two camera shots adjacent.
TIMESTAMP=\env TZ=’UTC’ date +%Y%m%d%H%M`
DEST=”${CAM_0}/Popa${TIMESTAMP}0.mp4”`
The configuration file ensures that all of the video is uniform. It sets the size of the video frames to be equal to those made by my camera: 1920 x 1080. It isn’t cinema quality and it will do.
Here are links to the full sources for grabVideo.sh, the script that makes a pair of fifteen second recordings each hour; and grabConfig.txt, the configuration for the video capture.
Power management
The Pi 5 that I’m using has a real time clock. A separate LF2032 three volt, lithium ion, rechargeable battery powers the clock. The clock can be programmed to wake the computer when the computer is sleeping.
The Pi 5 is a little power hungry. It wants five volts at three amps, fifteen watts when it is powered up. When the Pi 5 halts under power, it goes into a shallow sleep that consumes less, but still a substantial watt or so. I found a setting for the halt that puts the Pi 5 into a deeper sleep that consumes practically no power at all. The setting is in the eeprom configuration. The command to edit the eeprom configuration is,
sudo -E rpi-eeprom-config --edit
The new line that goes into that file, that effects the deep sleep, is,
POWER_OFF_ON_HALT=1
The last thing that the grabVideo.sh script does before exiting is to
write a wakeup time for the real time clock and then shut down the
computer.
  echo +3300 | tee /sys/class/rtc/rtc0/wakealarm
  sudo shutdown now
The magic number 3300 is a number of seconds equivalent to fifty-five minutes. This ensures that the Pi is awake again to make the next recording.
Power supply
The power supply selection turned-out to have a little wrinkle. You would think, well, you simply power it with a rechargeable battery power bank. It turns out that some power banks turn off when the power draw drops below a threshold. This means that the power bank stops powering the Pi when the Pi sleeps. The Pi has no power to wake up to. The whole scheme falls apart.
Other power banks continue to supply power regardless of whether there is a power draw. These power banks function well for the purpose.
The trouble comes with determining the behavior of any given power bank when shopping. You won’t find this behavior described in the online shopping descriptions. Sales people tell you what you want to hear, thus, it’s important to ask the open question without giving them a clue to the answer that you want, “What does this do when the connected device isn’t drawing power? Does it turn off or remain power on?” You’ll find that the sales person has no idea.
Further, the power bank needs to reliably supply a full three amps at five volts. If it does not, the Pi won’t run on it. This is a USB-C “fast charge” power level. Many power banks do not produce it.
Disabling sleep
When syncing files with the Pi, it is preferable that the Pi does not
get cued to go to sleep. To prevent
it sleeping, the grabVideo.sh script checks for a semaphore file.
Presence of the file causes the script to skip the sleep commands.
Here is a pair of scripts that manage the semaphore file. preventSleep.sh will write the file. allowSleep.sh will remove the file.
Scheduling the video recording
In order to get a recording every hour, the method used is to make a crontab
entry that runs the script. “Crontab” is short for chronograph table. It is
a table of time specifications and commands that run according to them.
The command to edit the table, the “crontab” is crontab -e.
The line in the table that enables recording the video each hour is,
0 * * * grabVideo.sh
Each user on the computer can have their own crontab. This includes
the root user.
There is one additional wrinkle. The shutdown command, the command
that puts the Pi in ultra low power mode, must be run as sudo. “Sudo”
stands for “Super user do”. Even the root user, the user with super powers,
must run the shutdown command using sudo. The trouble is that sudo
is interactive. It prompts the root password. The only time it does not
prompt the root password is when the user invoking it is already root.
This means that, in order to be non-interactive, to be automated, the
grabVideo.sh script must be run by the root user. This means that it must
be scheduled by the crontab for the root user.
sudo su
crontab -e
Another wrinkle is that all of the files written by the script– the video
and log files –will belong to root. This is a minor inconvenience. It pays
to run the grabVideo.sh script for the first time as the login user.
In this way, the directory paths to the files, these directories created on
the first run, will not themselves belong to the root user.

Administering the files
In order to backup the scripts or put them on the Pi, I made a pair of scp
secure copy commands. The script, pi-write.sh copies a file from my
local directory to the Pi. The script, pi-read.sh copies a file from the
Pi to my local directory.
The command, pi-synch.sh uses the rsync utility to copy any video files from the Pi,
not already on my computer, to my computer.
Finally, pi-admin.sh is a script that reliably opens a secure shell (ssh) session on the Pi.
I’m not sure why I had to sudo in order to run ssh on my Mac, but there it
is. It works.